What is Ditsmod
Introduction to Ditsmod
Ditsmod is a Node.js-based web framework designed for building highly extensible and fast applications. Its name combines DI + TS + Mod to highlight its key features: it includes Dependency Injection, is written in TypeScript in ESM format, and is designed with strong Modularity in mind.
Key Features of Ditsmod
- Modular architecture with decorators, enabling declarative application structure definition.
- Support for creating custom extensions (sometimes referred to as plugins) that can initialize asynchronously and depend on one another.
- Built-in OpenAPI support with request validation based on OpenAPI metadata.
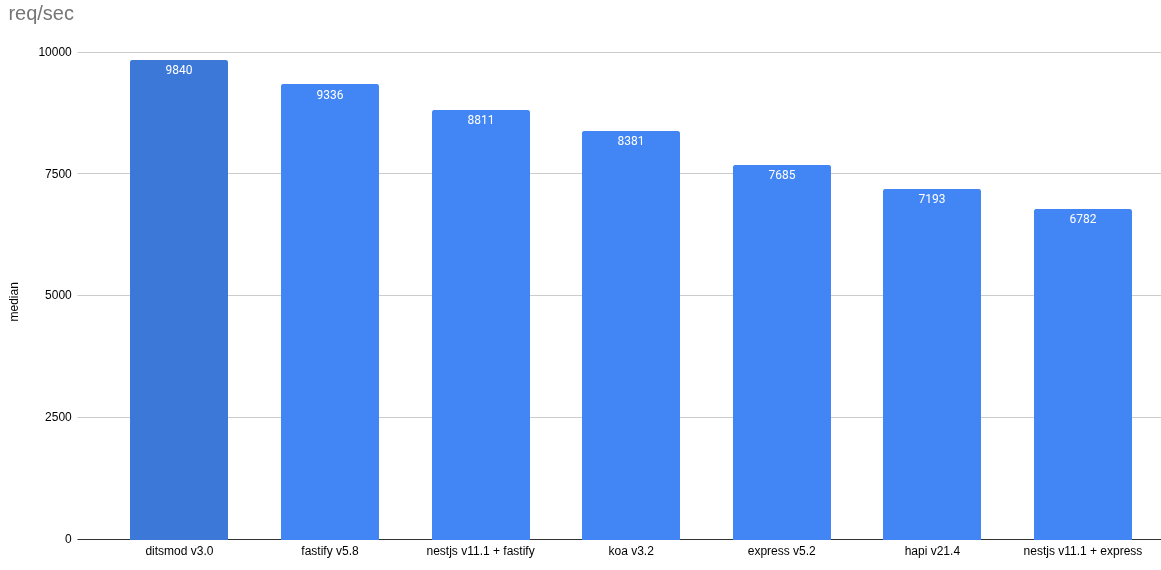
- As of today, Ditsmod is one of the fastest Node.js web frameworks:
Some architectural concepts in Ditsmod are inspired by Angular, with its DI system built on Angular's native DI module.
Prerequisites
Please make sure that Node.js >= v24.0.0 is installed on your operating system.
Installation
You can install the @ditsmod/cli package globally:
npm i -g @ditsmod/cli
To see the list of all available commands and options of @ditsmod/cli, run:
dm --help
Or to see the help for a specific command (e.g., new or start):
dm new --help
dm start --help
This is how you can create a starter REST application project:
dm new my-app
You can also use @ditsmod/cli without a global installation:
npx @ditsmod/cli new my-app
Add AGENTS.md and SKILL.md for AI agents
The file AGENTS.md is intended for AI agents and should be placed in the root directory of the repository. This file will be taken into account by the AI agent every time you interact with the agent. To copy the latest version of AGENTS.md, run the following command:
cd my-app # Go to starter repository
npm run setup:agents
Additionally, you can install AI agent skills to help them better understand the specifics of Ditsmod applications:
npx skills add https://github.com/ditsmod/agent-skills --skill '*' -y
AI agent skills are only loaded when needed, when you ask something relevant to them.
Start in Development Mode
You can start the application in development mode with the following command:
npm run start:dev
Or directly using Ditsmod CLI:
ditsmod start
# or using the shorthand alias:
dm start
The @ditsmod/cli utility automatically handles incremental TypeScript compilation and restarts the Node.js server whenever source files are changed, eliminating the need to run separate compiler and server terminals.
You can customize the startup behavior using options:
-d, --debug [hostport]— runs Node.js in debug mode with the--inspectflag.--verbose— shows verbose progress of TypeScript Project References compilation.--restart-delay <ms>— delay in milliseconds before restarting the server after successful compilation (default is300).--watch-assets <globs...>— non-TypeScript asset globs to watch and copy todist/on changes.
You can check the server operation using curl:
curl -i localhost:3000/api/hello
Or simply by going to http://localhost:3000/api/hello in your browser.
By default, the application works with info log level. You can change it in the file src/app/app.module.ts (or apps/backend/src/app/app.module.ts in the monorepository).
Thanks to ditsmod/rest-starter's use of the so-called Project References and tsc -b build mode, even very large projects compile very quickly.
Note that there are four config files for TypeScript in the ditsmod/rest-starter repository:
tsconfig.json- the basic configuration used by your IDE (in most cases it is probably VS Code).tsconfig.build.json- this configuration is used to compile the code from thesrcdirectory to thedistdirectory, it is intended for application code.tsconfig.e2e.json- this configuration is used to compile end-to-end tests.tsconfig.unit.json- this configuration is used to compile unit tests.
Also, note that since ditsmod/rest-starter is declared as an EcmaScript Module (ESM), you can use native Node.js aliases to shorten file paths. This is analogous to compilerOptions.paths in tsconfig. Such aliases are declared in package.json in the imports field:
"imports": {
  "#app/*": "./dist/app/*"
},
Now you can use it, for example in the e2e folder, like this:
import { AppModule } from '#app/app.module.js';
At the moment (2025-10-07) TypeScript does not yet fully support these aliases, so it is advisable to duplicate them in the tsconfig.json file:
// ...
{
  "compilerOptions": {
    // ...
    "paths": {
      "#app/*": ["./src/app/*"]
    }
  }
}
Note that in package.json the aliases point to dist, while in tsconfig.json they point to src.
Start in product mode
The application is compiled and the server is started in product mode using the command:
npm run build
npm run start-prod
Entry file for Node.js
After installing Ditsmod starter, the first thing you need to know: all the application code is in the src folder, it is compiled using the TypeScript utility tsc, after compilation it goes to the dist folder, and then as JavaScript code it can be executed in Node.js.
Let's look at the src/main.ts file:
import { ServerOptions } from 'node:http';
import { RestApplication } from '@ditsmod/rest';

import { AppModule } from './app/app.module.js';
import { checkCliAndSetPort } from './app/utils/check-cli-and-set-port.js';

const serverOptions: ServerOptions = { keepAlive: true, keepAliveTimeout: 5000 };
const app = await RestApplication.create(AppModule, { serverOptions, path: 'api' });
const port = checkCliAndSetPort(3000);
app.server.listen(port, '0.0.0.0');
After compilation, it becomes dist/main.js and becomes the entry point for running the application in production mode, and so why you will specify it as an argument to Node.js:
node dist/main.js
Looking at the file src/main.ts, you can see that an instance of the class RestApplication is created, and as an argument for the method create() is passed AppModule. Here AppModule is the root module to which other application modules then imports.
ExpressJS vs. Ditsmod
For comparison, the following examples demonstrate the minimal code needed to start applications with ExpressJS and Ditsmod.
import express from 'express';
const app = express();

app.get('/hello', function (req, res) {
  ctx.send('Hello, World!');
});

app.listen(3000, '0.0.0.0');
import { controller, route, restRootModule, RestApplication } from '@ditsmod/rest';

@controller()
class ExampleController {
  @route('GET', 'hello')
  tellHello() {
    return 'Hello, World!';
  }
}

@restRootModule({ controllers: [ExampleController] })
class AppModule {}

const app = await RestApplication.create(AppModule);
app.server.listen(3000, '0.0.0.0');
But why isn’t Ditsmod as minimalistic as ExpressJS? As you can see in the example, ExpressJS creates an application object, to which routes are then added. The app object represents the API of various separate components, including router configuration, error handling setup, rendering system configuration, HTTP server setup, etc. Such code looks very compact in simple examples, but in essence, it violates the Single Responsibility Principle. In contrast, Ditsmod clearly distinguishes between:
- the role of the controller in which the route is created;
- the role of the module where the controllers are declared;
- the role of the application that contains the HTTP server.
Looking at the amount of code, you might think that Ditsmod is slower than ExpressJS because of its verbosity. But in fact, only Ditsmod's cold start is slightly slower (it starts in 34 ms on my laptop, while ExpressJS starts in 4 ms). As for request processing speed, Ditsmod is ~30% faster than ExpressJS.
More application examples are available in the Ditsmod repository, as well as in the RealWorld repository.
P.S. Although a link to a repository with all the necessary settings for Ditsmod applications is provided above, still, if you want to use only the code from the previous example, do not forget to specify the following in the tsconfig files:
{
  "compilerOptions": {
    // ...
    "experimentalDecorators": true,
    "emitDecoratorMetadata": true
  }
}